A stuck chuck on an impact driver can be unjammed using several methods, ranging from simple tapping to applying penetrating oil, using pliers for leverage, or, as a last resort, disassembling the chuck. The most effective approach depends on the cause of the jam, which often includes debris, rust, overtightening, or damaged bits. Always disconnect the power and wear safety glasses and gloves before attempting any repairs.
What is an Impact Driver and Why Does Its Chuck Get Stuck?
An impact driver is a high-torque power tool designed to drive screws and loosen bolts with exceptional efficiency. Unlike a standard drill, it combines rotational force with rapid, short bursts of hammering action (impacts) along the axis of rotation, making it perfect for driving long fasteners or working with stubborn materials. At its core, the impact driver features a quick-release chuck, usually a 1/4-inch hex shank, which allows for fast and easy bit changes.
However, this convenient chuck mechanism can sometimes become jammed. Several factors contribute to a stuck chuck:
- Debris and Dirt: Over time, dust, wood chips, metal shavings, and general grime can accumulate inside the chuck, impeding the movement of the ball bearings or locking mechanism.
- Rust and Corrosion: Exposure to moisture can lead to rust formation within the chuck, causing components to seize up.
- Over-tightening or Excessive Force: Applying too much pressure or torque can cause the bit to wedge tightly into the chuck, making it difficult to release.
- Damaged or Low-Quality Bits: Cheap or worn-out bits can deform, strip, or even break off inside the chuck, leading to a severe jam. The softer metal of some bits can bind more easily.
- Heat Expansion: Prolonged heavy use can generate heat, causing metal components to expand and temporarily seize.
Understanding these causes is the first step towards effectively diagnosing and resolving the issue, and more importantly, preventing future jams.
Essential Tools and Safety Precautions Before You Start
Before attempting any repairs on your impact driver, it’s crucial to prepare your workspace and gather the necessary tools. Safety should always be your top priority to prevent injury and further damage to your tool.
Tools You’ll Need
To address a stuck impact driver chuck, you might need a combination of the following:
- Safety Glasses and Gloves: Essential for protecting your eyes from flying debris and your hands from pinches or sharp edges.
- Penetrating Oil (e.g., WD-40, LPS 2): Helps to loosen rust and grime.
- Pliers (Needle-nose, Vice-grips, or Channel-locks): For gripping stubborn bits or chuck collars.
- Soft-faced Hammer or Mallet: For gentle tapping.
- Screwdriver: If disassembly is required.
- Bench Vice: Provides a secure grip on the bit or tool for leverage.
- Compressed Air: For cleaning out debris after the bit is removed.
- Wire or Zip Tie: To hold the chuck collar back.
- Electrical Contact Cleaner or Degreaser: For thorough cleaning.
- Lithium Grease: For lubricating the chuck after cleaning.
Safety First: Disconnecting Power and Personal Protective Equipment
|
Our Picks for the Best Impact Driver in 2026
As an Amazon Associate I earn from qualifying purchases.
|
||
| Num | Product | Action |
|---|---|---|
| 1 | Milwaukee Electric - M18 Fuel. 1/4 HEX Impact Driver |

|
| 2 | DEWALT ATOMIC 20V MAX* Impact Driver, Cordless, Compact, 1/4-Inch, Tool Only (DCF809B) |
|
| 3 | Impact Driver: 21V 1/4" Hex Cordless Impact Driver, 230N.m (2,035in-lbs) Brushless Impact Driver Drill Set, 20Psc Screwdriver Bits, 2.0 Ah Battery, Variable Speed for DIY and Automotive |
|
| 4 | DEWALT 20V MAX XR Impact Driver, 1/4 Inch High Torque Brushless 3 Speed Premium Cordless with LED Light, Extended Runtime, Tool Only (DCF845B) |
|
| 5 | DEWALT DCF850B 20V Cordless Brushless Compact 1/4'' Impact Driver (Tool Only) (DCF850B-NBX) |
|
| 6 | AVID POWER 20V Brushless Impact Driver Kit, 2220in-lbs High Torque, 2-Speed Mode, Variable Speed Cordless Impact Driver, Brake Stop Function, Compact Design with LED Light, 4 Sockets & 4 Bits Included |
|
| 7 | BLACK+DECKER 20V MAX* POWERCONNECT 1/4 in. Cordless Impact Driver Kit (BDCI20C) |
|
| 8 | DEWALT 20V MAX Cordless Drill and Impact Driver, Power Tool Combo Kit , Includes 2 Batteries, Charger and Bag (DCK240C2) |
|
| 9 | DEWALT 20V MAX Impact Driver, 1/4 Inch, Battery and Charger Included (DCF787D1) |
|
| 10 | DEWALT 20V MAX Cordless Impact Wrench, 1/2 Impact Gun, 4-Speed High Torque with Hog Ring Anvil and LED Light, Brushless Motor, Precision Wrench, Tool Only (DCF900B) |
|
Always disconnect your impact driver from its power source before you begin. For corded models, unplug it. For cordless models, remove the battery pack completely. This prevents accidental activation, which could cause serious injury. Wear appropriate personal protective equipment (PPE), including safety glasses to shield your eyes from debris, and work gloves to protect your hands. Ensure you work in a well-lit area with good ventilation, especially when using penetrating oils or cleaners.
Step-by-Step Guide to Unjamming Your Impact Driver Chuck
When your impact driver’s chuck is stuck, a systematic approach often yields the best results. Start with the least invasive methods and progress to more rigorous techniques if necessary.
Method 1: The “Tap and Wiggle” Technique
For bits that are only slightly stuck, a gentle approach can sometimes dislodge them.
- Pull the Collar: Firmly pull the quick-release collar forward to its maximum extent.
- Gently Tap: While holding the collar, gently tap the end of the bit with a soft-faced hammer or mallet. Rotate the bit slightly and tap from different angles. This can help dislodge any minor dirt or rust that’s binding the bit.
- Wiggle and Pull: Try wiggling the bit while pulling the collar and simultaneously pulling the bit out.
Method 2: Applying Penetrating Oil
If tapping doesn’t work, rust or grime might be the culprit. Penetrating oil can work wonders to free seized components.
- Apply Oil: Liberally spray a good quality penetrating oil (like WD-40 or LPS 2) around the base of the bit and into the chuck opening. If possible, pull the collar forward slightly to expose more of the internal mechanism and spray directly there.
- Allow to Penetrate: Let the oil sit and work its magic for at least a few hours, or ideally, overnight. This gives the oil time to break down rust and penetrate tight spaces.
- Attempt Removal: After waiting, try the “Tap and Wiggle” technique again. Pull the collar, tap the bit, and then firmly pull the bit out with pliers if needed.
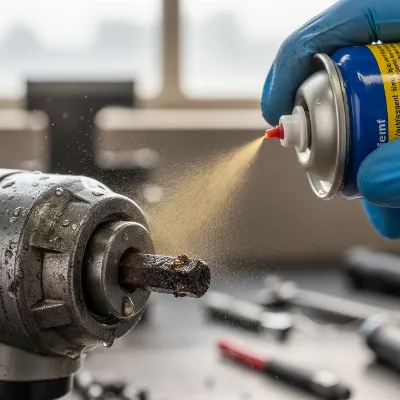 A close-up view of an impact driver chuck being sprayed with penetrating oil to loosen a stuck bit.
Method 3: Using Pliers or a Vice
For more stubborn bits, you’ll need extra leverage.
- Secure the Chuck Collar: This is a crucial step. Use a zip tie or strong wire to hold the quick-release collar of the impact driver fully forward. Wrap it tightly to keep the collar retracted, exposing the bit’s base.
- Grip the Bit: If you can, firmly grip the bit with a pair of Vice-grips or Channel-lock pliers.
- Pull and Twist: With the collar held back and the bit gripped, apply steady, strong pulling force while also trying to twist the bit slightly. You might need to brace the impact driver against a workbench or have a second person hold the tool.
- Bench Vice Method: If the bit is extremely stubborn, place the bit end into a sturdy bench vice, securing it tightly. Then, with both hands, grip the impact driver body and pull straight back while keeping the chuck collar retracted (using a zip tie is very helpful here).
Method 4: Heat and Cold Treatment (Use with Extreme Caution)
This method exploits the expansion and contraction of metals but should be used as a last resort due to potential tool damage.
- Apply Heat: Carefully use a heat gun (NOT an open flame) to gently heat the chuck collar for a very short period (e.g., 10-15 seconds). The goal is to cause the chuck’s metal to expand slightly, potentially loosening its grip on the bit.
- Apply Cold to Bit (Optional): Immediately after heating the chuck, you could try applying a localized cold spray or an ice cube to the bit itself (if safe and practical), aiming to contract the bit.
- Attempt Removal: Quickly try to remove the bit using pliers while the temperature difference is still in effect. Repeat only if absolutely necessary and with caution.
Method 5: Disassembling the Chuck (As a Last Resort)
If all other methods fail, and you suspect a broken bit piece or severe internal damage, you might need to disassemble the chuck. This is more complex and varies by impact driver model.
- Consult Manual: Refer to your impact driver’s user manual for specific disassembly instructions.
- Careful Disassembly: Generally, this involves removing screws holding the impact driver housing together, then carefully disassembling the chuck mechanism. Be mindful of small springs and ball bearings that can easily get lost.
- Clean and Reassemble: Once the bit is removed, thoroughly clean all internal components with an electrical contact cleaner and then re-lubricate with lithium grease before reassembling. This approach often requires a certain level of mechanical aptitude.
Troubleshooting Common Stuck Chuck Scenarios
Sometimes, the issue isn’t just a simple jam but a specific problem that requires targeted troubleshooting.
Bit Is Stripped or Broken Inside the Chuck
If the hex head of the bit is stripped or a piece of the bit has broken off inside, extraction becomes more challenging.
- Broken Piece: If a significant portion is broken off, you might need to use a very small punch and hammer to try and tap the broken piece further into the chuck (if it’s a through-hole design) or carefully pry it out with fine-tipped pliers. Disassembly of the chuck is often the most reliable solution for deeply broken bits.
- Stripped Hex: If the bit is stripped, gripping it with pliers directly might not work. Try gripping the sides of the bit body with Vice-grips, or if it’s a larger bit, drilling a small pilot hole into the center (if material allows) and using a screw extractor.
Chuck Is Stuck Open or Closed Without a Bit
This indicates an issue with the internal locking mechanism or spring.
- Stuck Open: Debris is likely preventing the ball bearings from moving into position. Try spraying penetrating oil and repeatedly pulling the collar forward and releasing it to try and dislodge any particles. Use compressed air to blow out debris.
- Stuck Closed: The spring mechanism might be seized or a component might be bent. Again, penetrating oil and careful manipulation of the collar might help. If not, disassembly will be required to inspect the spring and ball bearings.
Rust or Corrosion Causing the Jam
Rust is a common culprit.
- Rust Removal: Penetrating oils are specifically designed to break down rust. Allow ample soaking time (24 hours is often recommended).
- Gentle Persuasion: After soaking, apply gentle tapping and wiggling motions. Avoid excessive force, which could damage the chuck components.
- Wire Brush/Degreaser: Once the bit is out, use a small wire brush or a degreasing agent to clean out any remaining rust and corrosion from the chuck opening and internal mechanisms before lubricating.
Preventing a Stuck Impact Driver Chuck in the Future
Prevention is always better than cure. Adopting a few simple habits can significantly reduce the likelihood of your impact driver chuck getting stuck again.
Regular Cleaning and Lubrication
- Blow Out Debris: After each use, or at least regularly, use compressed air to blow out any dust, chips, or debris from the chuck opening. This prevents buildup that can seize the mechanism.
- Lubricate the Chuck: Periodically apply a small amount of light machine oil or lithium grease to the chuck’s internal mechanism. Pull the collar back and apply lubricant where the ball bearings retract. Work the collar back and forth several times to distribute the lubricant.
Using High-Quality Bits
Cheap, low-quality bits are often made from softer metals that are more prone to stripping, deforming, or breaking under the high torque of an impact driver.
- Impact-Rated Bits: Always use bits specifically rated for impact drivers. These bits are designed to withstand the intense forces and have a more durable hex shank.
- Inspect Bits: Before use, inspect your bits for any signs of wear, bending, or damage. Replace worn bits immediately.
Proper Storage Techniques
How you store your impact driver can greatly influence its longevity and prevent issues like rust.
- Dry Environment: Store your impact driver in a dry place to prevent moisture accumulation and rust.
- Tool Bag/Case: Keep it in a dedicated tool bag or case to protect it from dust, dirt, and accidental impacts that could deform the chuck.
Avoiding Over-tightening
While impact drivers are powerful, excessive force can still cause bits to bind.
- Appropriate Torque: Use the appropriate torque setting or trigger control for the task at hand. Avoid forcing the bit into the material beyond what’s necessary.
- Let the Tool Do the Work: Allow the impact mechanism to do its job rather than relying on brute force, which can jam the bit.
Expert Tips for Impact Driver Maintenance
Maintaining your impact driver goes beyond just keeping the chuck free. Regular, holistic maintenance ensures the tool performs optimally and lasts for years.
Annual Inspection Checklist
Make it a habit to perform an annual check-up on your impact driver:
- Cord/Battery: Inspect cords for fraying or damage; check battery terminals for corrosion.
- Housing: Look for cracks or damage to the tool’s body.
- Ventilation: Ensure air vents are clear of dust and debris to prevent overheating.
- Chuck Action: Check that the quick-release collar moves freely and the bit locks securely.
- Motor Brushes (if applicable): For brushed motors, check and replace worn carbon brushes.
- Fasteners: Ensure all external screws are tight.
When to Seek Professional Help or Replace Your Tool
While many chuck issues can be resolved with DIY methods, there are times when professional intervention or tool replacement is necessary.
- Persistent Jams: If your chuck frequently jams despite regular cleaning and proper bit usage, there might be a deeper internal issue with the mechanism that a professional technician can diagnose.
- Severe Damage: If the chuck housing is bent, cracked, or if major internal components appear damaged during disassembly, it might be beyond a simple DIY fix.
- Cost-Benefit Analysis: Sometimes, the cost of professional repair for an older or lower-end impact driver can approach the price of a new tool. Consider if investing in a new, more reliable impact driver is a more economical choice.
“A well-maintained impact driver is a safer, more efficient tool. Don’t wait for a jam to think about maintenance; regular care is key to longevity and performance.” – Liam O’Connell, Master Electrician & ReviewedJobs.com Tool Expert
Buying Guide: Recommendations from ReviewedJobs.com
Choosing the right accessories and maintenance products is crucial for keeping your impact driver running smoothly and preventing future chuck issues.
Choosing Durable Impact Driver Chucks
While you can’t typically “choose” the chuck on your existing impact driver, you can make informed decisions when purchasing a new tool. Look for impact drivers from reputable brands known for their durable chuck mechanisms. Features to consider include:
- All-Metal Construction: Chucks made entirely of metal tend to be more robust and less prone to wear and deformation than those with plastic components.
- Sealed Mechanism: Some chucks feature better sealing against dust and debris, reducing the chance of internal contamination.
- Brand Reputation: Brands like Milwaukee, DeWalt, Makita, Bosch, and Ryobi are generally known for their quality and offer good after-sales support.
Top Lubricants and Cleaning Products for Impact Drivers
- Penetrating Oils: Products like WD-40 Specialist Penetrant or LPS 2 Multi-Purpose Lubricant are excellent for freeing rusted or seized parts.
- Electrical Contact Cleaner: For thoroughly cleaning out grime and residue without leaving oily residue, CRC QD Electronic Cleaner is a great choice.
- Lithium Grease: For long-lasting lubrication of moving parts inside the chuck, a small tube of White Lithium Grease provides excellent protection against wear and corrosion.
Conclusion
A stuck chuck on your impact driver is undoubtedly a nuisance, but it’s a problem that can almost always be resolved with a bit of patience and the right techniques. By understanding why chucks get stuck and employing methods from gentle tapping and lubrication to more robust leverage with pliers or a vise, you can typically free your bit and restore your tool’s functionality. prevention is your best defense: regular cleaning, using high-quality impact-rated bits, and proper storage are vital for keeping your impact driver in prime working condition. Don’t let a jammed chuck slow down your projects. With these tips, you’re now equipped to tackle the problem head-on and ensure your impact driver remains a reliable workhorse. What maintenance tips have you found most effective for your own power tools?
Frequently Asked Questions
How often should I lubricate my impact driver chuck?
It’s recommended to lubricate your impact driver chuck every few months or after extensive use, especially if you work in dusty or damp environments. A light application of lithium grease or machine oil will help keep the internal mechanisms moving smoothly and prevent rust, extending the chuck’s lifespan and preventing future jams.
Frequently Asked Questions
What causes an impact driver chuck to get stuck?
An impact driver chuck typically gets stuck due to debris accumulation, rust, overtightening of bits, or using damaged/low-quality bits. Heat expansion from prolonged use can also temporarily seize components, making bit removal difficult.
What tools are essential for unjamming an impact driver chuck?
Essential tools for unjamming an impact driver chuck include safety glasses, gloves, penetrating oil (like WD-40), pliers (Vice-grips or Channel-locks), and a soft-faced hammer. A bench vice or compressed air can also be very helpful for stubborn jams.
How can I prevent my impact driver chuck from getting stuck in the future?
Preventing a stuck impact driver chuck involves regular cleaning with compressed air, periodic lubrication with lithium grease, and using high-quality, impact-rated bits. Proper storage in a dry environment and avoiding overtightening also significantly reduce the risk of jams.
Is it safe to use heat to unjam an impact driver chuck?
Using heat to unjam an impact driver chuck should be a last resort and done with extreme caution, using a heat gun for only 10-15 seconds. Excessive heat can damage internal components, springs, or the tool's housing, potentially leading to permanent damage.
When should I consider professional repair for a stuck impact driver chuck?
You should consider professional repair if your impact driver chuck frequently jams despite regular maintenance, if the chuck housing is visibly bent or cracked, or if major internal components appear damaged during a careful disassembly attempt. Sometimes, replacing an older tool is more cost-effective than professional repair.
How often should I lubricate my impact driver chuck?
It's recommended to lubricate your impact driver chuck every few months or after extensive use, especially if you work in dusty or damp environments. A light application of lithium grease or machine oil will help keep the internal mechanisms moving smoothly and prevent rust, extending the chuck's lifespan and preventing future jams.

While the advice is solid, I was hoping for a bit more detail on disassembling the chuck. My Ryobi’s quick-release mechanism seems to be the culprit, and none of the simpler methods worked for me. It’s probably due to some internal debris, but I’m hesitant to take it apart without clearer instructions. Still, the info on common causes like overtightening was useful.
This was exactly what I needed! My impact driver’s chuck got completely jammed with a damaged bit, and I was about to give up and buy a new tool. The suggestion to use a vise to hold the driver while working on the chuck made all the difference. It gave me the stability I needed to finally get that bit out. Thanks for these practical solutions!
Great tips! I usually just try tapping it, but the pliers for leverage idea is genius. I had a bit stuck in my Milwaukee impact driver last week after driving some long fasteners into hardwood, and it was a nightmare. Next time, I’ll definitely try the pliers before I get too frustrated. Good to know there are multiple options.
I’ve had my fair share of stuck bits, and the penetrating oil trick really saved me a few times. My old DeWalt 1/4-inch chuck gets jammed up with rust pretty often since I work outdoors a lot. This guide was super helpful, especially the reminder about safety glasses and gloves. Definitely worth a read if you’re dealing with a stubborn chuck.